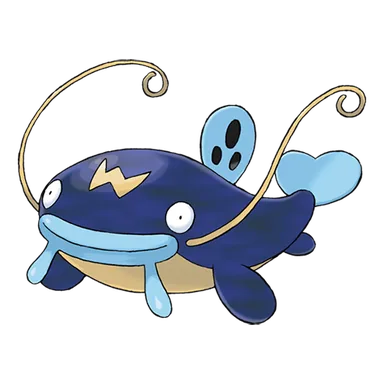
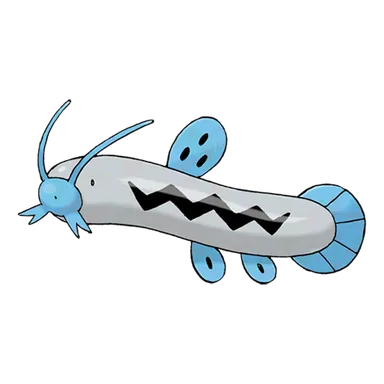
Whiscash is a Water/Ground-type Pokémon introduced in Generation III and a final stage of its evolution line, with a base stat total of 468.
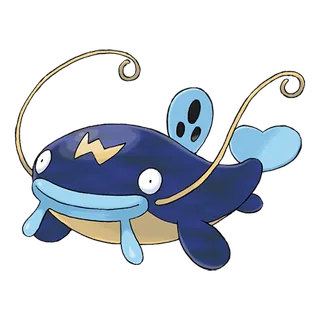
Whiscash


Whiscash

Abilities

Oblivious

Prevents attraction.

Anticipation

Senses the foe’s dangerous moves.

Hydration

Heals status problems if it is raining.

Hidden Ability

Base Stats

Total: 468
EV Yield: 2 HP
HP: 110
Attack: 78
Defense: 73
Sp. Atk: 76
Sp. Def: 71
Speed: 60

Whiscash's Weaknesses and Resistances

Evolution Chain

Barboach evolves into Whiscash at level 30.

Whiscash Playthrough, Competitive, and Nuzlocke Usage

Using Whiscash in a Playthrough

Barboach evolves into Whiscash at level 30, producing a Water/Ground Pokemon whose greatest practical strength is an excellent defensive typing rather than exceptional raw stats. The combination grants a complete Electric immunity and resistances to Fire, Poison, Rock, and Steel while leaving Grass as its only ordinary weakness, although Grass attacks deal devastating quadruple damage. Whiscash has base 110 HP but only middling defenses and offenses, with base 78 Attack and 76 Special Attack; in Generation III this balance works reasonably well because Water attacks are special while Ground attacks such as Earthquake are physical. Later games can add tools such as Dragon Dance, Waterfall, Aqua Tail, Zen Headbutt, Stone Edge, Ice coverage, and utility, while Hydration can remove status during rain and Anticipation can warn the player when an opponent carries a super-effective or one-hit-knockout move. Whiscash is therefore a comfortable story Pokemon when exploiting its Electric immunity and broad STAB coverage, but its modest power and Speed mean it rarely sweeps without setup and any suspected Grass coverage should be treated as an emergency.

Whiscash in Competitive Pokémon

Whiscash has generally remained in the lowest competitive tiers because Water/Ground is an excellent typing attached to underwhelming offensive and defensive numbers. Base 110 HP looks impressive, but 73 Defense and 71 Special Defense make the actual bulk only moderate, while base 78 Attack, 76 Special Attack, and 60 Speed provide little immediate pressure. Dragon Dance gives Whiscash a rare setup option that can raise both Attack and Speed, but Smogon analyses have repeatedly noted that even after a boost it often lacks the power and Speed to clean teams as reliably as stronger setup sweepers. Later formats have also used Stealth Rock, Spikes, Earthquake, Water STAB, and utility to give it a more supportive identity, while Hydration can theoretically support Rest or status recovery in rain. Its defining competitive problem is therefore not a lack of useful mechanics but efficiency: many other Water/Ground Pokemon possess the same excellent typing alongside stronger stats, recovery, or utility.

Whiscash in Nuzlockes

Whiscash is a generally safe Nuzlocke Pokemon because Water/Ground typing compresses its defensive risks into one glaring category: Grass. The Electric immunity creates excellent switch opportunities, base 110 HP gives useful insurance against neutral attacks, and Water plus Ground STAB can cover a large portion of ordinary opponents. Anticipation can be especially useful in a blind or partially blind run because a warning on entry may reveal that an apparently harmless opponent carries a super-effective or one-hit-knockout move. The danger is absolute when Grass coverage appears, since quadruple damage can erase Whiscash even from high health and its mediocre Speed often prevents it from escaping by simply attacking first. Used with disciplined coverage checking, the line offers far more Nuzlocke safety than its modest competitive reputation would suggest.

Learnsets

64 moves · Scarlet Violet

Level Up

- Thrash normal type 120 100 physical move
1 Water Gun water type 40 100 special move
1 Rest psychic type --- --- status move
1 Snore normal type 50 100 special move
1 Mud-Slap ground type 20 100 special move
1 Tickle normal type --- 100 status move
1 Zen Headbutt psychic type 80 90 physical move
1 Belch poison type 120 90 special move
12 Water Pulse water type 60 100 special move
18 Amnesia psychic type --- --- status move
24 Aqua Tail water type 90 90 physical move
33 Muddy Water water type 90 85 special move
40 Earthquake ground type 100 100 physical move
48 Future Sight psychic type 120 100 special move
56 Fissure ground type --- 30 physical move

Machine

- Body Slam normal type 85 100 physical move
- Take Down normal type 90 85 physical move
- Double-Edge normal type 120 100 physical move
- Hydro Pump water type 110 80 special move
- Surf water type 90 100 special move
- Ice Beam ice type 90 100 special move
- Blizzard ice type 110 70 special move
- Hyper Beam normal type 150 90 special move
- Earthquake ground type 100 100 physical move
- Waterfall water type 80 100 physical move
- Swift normal type 60 --- special move
- Amnesia psychic type --- --- status move
- Rest psychic type --- --- status move
- Rock Slide rock type 75 90 physical move
- Substitute normal type --- --- status move
- Curse ghost type --- --- status move
- Protect normal type --- --- status move
- Scary Face normal type --- 100 status move
- Mud-Slap ground type 20 100 special move
- Spikes ground type --- --- status move
- Icy Wind ice type 55 95 special move
- Outrage dragon type 120 100 physical move
- Sandstorm rock type --- --- status move
- Endure normal type --- --- status move
- Sleep Talk normal type --- --- status move
- Rain Dance water type --- --- status move
- Sunny Day fire type --- --- status move
- Future Sight psychic type 120 100 special move
- Whirlpool water type 35 85 special move
- Facade normal type 70 100 physical move
- Helping Hand normal type --- --- status move
- Weather Ball normal type 50 100 special move
- Rock Tomb rock type 60 95 physical move
- Sand Tomb ground type 35 85 physical move
- Muddy Water water type 90 85 special move
- Mud Shot ground type 55 95 special move
- Dragon Dance dragon type --- --- status move
- Water Pulse water type 60 100 special move
- Earth Power ground type 90 100 special move
- Giga Impact normal type 150 90 physical move
- Zen Headbutt psychic type 80 90 physical move
- Stone Edge rock type 100 80 physical move
- Stealth Rock rock type --- --- status move
- Bulldoze ground type 60 100 physical move
- High Horsepower ground type 95 95 physical move
- Stomping Tantrum ground type 75 100 physical move
- Liquidation water type 85 100 physical move
- Tera Blast normal type 80 100 special move
- Chilling Water water type 50 100 special move

Pokédex Entries

17 entries
Ruby

WHISCASH is extremely territorial. Just one of these POKéMON will claim a large pond as its exclusive territory. If a foe approaches it, it thrashes about and triggers a massive earthquake.

Sapphire

If WHISCASH goes on a wild rampage, it sets off a quake-like tremor with a radius of over three miles. This POKéMON has the ability to predict real earthquakes.

Emerald

Mysteriously, it can foretell earthquakes. In the daytime, it sleeps in mud at the bottom of a pond. When it awakens, it continually feeds throughout the night.

Firered / Leafgreen

It makes its nest at the bottom of swamps. It will eat anything - if it is alive, WHISCASH will eat it.

Diamond

It is very territorial. It repels foes by setting off tremors that extend over a three-mile radius.

Pearl

As a result of causing tremors by thrashing about, it developed the ability to foretell real quakes.

Platinum / Black / White / Black 2 / White 2

It is extremely protective of its territory. If any foe approaches, it attacks using vicious tremors.

Heartgold / Soulsilver / X / Shield

It claims a large swamp to itself. If a foe comes near it, it sets off tremors by thrashing around.

Y

It makes its nest at the bottom of swamps. It will eat anything--if it is alive, Whiscash will eat it.

Omega Ruby

Whiscash is extremely territorial. Just one of these Pokémon will claim a large pond as its exclusive territory. If a foe approaches it, it thrashes about and triggers a massive earthquake.

Alpha Sapphire

If Whiscash goes on a wild rampage, it sets off a quake-like tremor with a radius of over three miles. This Pokémon has the ability to predict real earthquakes.

Sun

A glutton that devours anything that moves, it quietly lurks at the bottom of swamps, lying in wait for prey.

Moon

Sighting Whiscash leaping from the water is believed to herald an earthquake.

Ultra Sun

Whiscash shakes the ground at high intensities to intimidate its opponents. It swallows its prey whole—along with mud from the swamp floor.

Ultra Moon

Its vision is not that good. It senses vibrations in the water with its whiskers to determine the location of its prey.

Sword

It makes its nest at the bottom of swamps. It will eat anything—if it is alive, Whiscash will eat it.

Legends Arceus

Strikes its caudal fin against the swamp bed to shake the ground and startle its prey. It will then swallow the fleeing prey whole. People mistook this behavior as the cause of earthquakes.

Where To Find Whiscash

26 locations
Paniola Town · AlolaSOS Encounter, SOS From Bubbling Spot · version details vary

Paniola Town Area

Moon max 30%
SOS Encounter · Lv. 10–18 · 15%SOS From Bubbling Spot · Lv. 10–18 · 15%
Sun max 30%
SOS Encounter · Lv. 10–18 · 15%SOS From Bubbling Spot · Lv. 10–18 · 15%
Ultra Moon max 30%
SOS Encounter · Lv. 10–17 · 15%SOS From Bubbling Spot · Lv. 10–22 · 15%
Ultra Sun max 30%
SOS Encounter · Lv. 10–17 · 15%SOS From Bubbling Spot · Lv. 10–22 · 15%
Poni Gauntlet · AlolaSOS Encounter, SOS From Bubbling Spot · version details vary

Poni Gauntlet Area

Moon max 30%
SOS Encounter · Lv. 10–59 · 15%SOS From Bubbling Spot · Lv. 10–59 · 15%
Sun max 30%
SOS Encounter · Lv. 10–59 · 15%SOS From Bubbling Spot · Lv. 10–59 · 15%
Ultra Moon max 30%
SOS Encounter · Lv. 10–61 · 15%SOS From Bubbling Spot · Lv. 10–66 · 15%
Ultra Sun max 30%
SOS Encounter · Lv. 10–61 · 15%SOS From Bubbling Spot · Lv. 10–66 · 15%
Poni Meadow · AlolaSOS Encounter, SOS From Bubbling Spot · version details vary

Poni Meadow Area

Moon max 30%
SOS Encounter · Lv. 10–57 · 15%SOS From Bubbling Spot · Lv. 10–57 · 15%
Sun max 30%
SOS Encounter · Lv. 10–57 · 15%SOS From Bubbling Spot · Lv. 10–57 · 15%
Ultra Moon max 30%
SOS Encounter · Lv. 10–57 · 15%SOS From Bubbling Spot · Lv. 10–62 · 15%
Ultra Sun max 30%
SOS Encounter · Lv. 10–57 · 15%SOS From Bubbling Spot · Lv. 10–62 · 15%
Seaward Cave · AlolaSOS Encounter, SOS From Bubbling Spot · version details vary

Seaward Cave Area

Moon max 30%
SOS Encounter · Lv. 10–15 · 15%SOS From Bubbling Spot · Lv. 10–15 · 15%
Sun max 30%
SOS Encounter · Lv. 10–15 · 15%SOS From Bubbling Spot · Lv. 10–15 · 15%
Ultra Moon max 30%
SOS Encounter · Lv. 10–17 · 15%SOS From Bubbling Spot · Lv. 10–22 · 15%
Ultra Sun max 30%
SOS Encounter · Lv. 10–17 · 15%SOS From Bubbling Spot · Lv. 10–22 · 15%
Vast Poni Canyon · AlolaSOS Encounter, SOS From Bubbling Spot · version details vary

Vast Poni Canyon Northwest

Moon max 30%
SOS Encounter · Lv. 10–44 · 15%SOS From Bubbling Spot · Lv. 10–44 · 15%
Sun max 30%
SOS Encounter · Lv. 10–44 · 15%SOS From Bubbling Spot · Lv. 10–44 · 15%
Ultra Moon max 30%
SOS Encounter · Lv. 10–46 · 15%SOS From Bubbling Spot · Lv. 10–51 · 15%
Ultra Sun max 30%
SOS Encounter · Lv. 10–46 · 15%SOS From Bubbling Spot · Lv. 10–51 · 15%
Meteor Falls · HoennSuper Rod · version details vary

Meteor Falls (B1F)

Emerald max 20%
Super Rod · Lv. 30–35 · 15%Super Rod · Lv. 35–40 · 4%Super Rod · Lv. 40–45 · 1%
Ruby max 20%
Super Rod · Lv. 30–35 · 15%Super Rod · Lv. 35–40 · 4%Super Rod · Lv. 40–45 · 1%
Sapphire max 20%
Super Rod · Lv. 30–35 · 15%Super Rod · Lv. 35–40 · 4%Super Rod · Lv. 40–45 · 1%

Meteor Falls (back)

Emerald max 20%
Super Rod · Lv. 30–35 · 15%Super Rod · Lv. 35–40 · 4%Super Rod · Lv. 40–45 · 1%
Ruby max 20%
Super Rod · Lv. 30–35 · 15%Super Rod · Lv. 35–40 · 4%Super Rod · Lv. 40–45 · 1%
Sapphire max 20%
Super Rod · Lv. 30–35 · 15%Super Rod · Lv. 35–40 · 4%Super Rod · Lv. 40–45 · 1%

Meteor Falls (back/small room)

Emerald max 20%
Super Rod · Lv. 30–35 · 15%Super Rod · Lv. 35–40 · 4%Super Rod · Lv. 40–45 · 1%
Ruby max 20%
Super Rod · Lv. 30–35 · 15%Super Rod · Lv. 35–40 · 4%Super Rod · Lv. 40–45 · 1%
Sapphire max 20%
Super Rod · Lv. 30–35 · 15%Super Rod · Lv. 35–40 · 4%Super Rod · Lv. 40–45 · 1%
Victory Road · HoennSuper Rod · version details vary

Victory Road (B2F)

Emerald max 20%
Super Rod · Lv. 30–35 · 15%Super Rod · Lv. 35–40 · 4%Super Rod · Lv. 40–45 · 1%
Ruby max 20%
Super Rod · Lv. 30–35 · 15%Super Rod · Lv. 35–40 · 4%Super Rod · Lv. 40–45 · 1%
Sapphire max 20%
Super Rod · Lv. 30–35 · 15%Super Rod · Lv. 35–40 · 4%Super Rod · Lv. 40–45 · 1%
Violet City · JohtoGood Rod, Old Rod, Super Rod · version details vary

Violet City

HeartGold max 180%
Good Rod · Lv. 20 · 40% · Swarm YesGood Rod · Lv. 20 · 15% · Swarm YesGood Rod · Lv. 20 · 10% · Swarm YesOld Rod · Lv. 10 · 15% · Swarm YesSuper Rod · Lv. 40 · 40% · Swarm YesSuper Rod · Lv. 40 · 30% · Swarm YesSuper Rod · Lv. 40 · 15% · Swarm YesSuper Rod · Lv. 40 · 10% · Swarm YesSuper Rod · Lv. 40 · 5% · Swarm Yes
SoulSilver max 180%
Good Rod · Lv. 20 · 40% · Swarm YesGood Rod · Lv. 20 · 15% · Swarm YesGood Rod · Lv. 20 · 10% · Swarm YesOld Rod · Lv. 10 · 15% · Swarm YesSuper Rod · Lv. 40 · 40% · Swarm YesSuper Rod · Lv. 40 · 30% · Swarm YesSuper Rod · Lv. 40 · 15% · Swarm YesSuper Rod · Lv. 40 · 10% · Swarm YesSuper Rod · Lv. 40 · 5% · Swarm Yes
Route 14 · KalosSuper Rod · version details vary

Road 14

X max 35%
Super Rod · Lv. 35 · 35%
Y max 35%
Super Rod · Lv. 35 · 35%
Route 19 · KalosSuper Rod · version details vary

Road 19

X max 35%
Super Rod · Lv. 45 · 35%
Y max 35%
Super Rod · Lv. 45 · 35%
Celestic Town · SinnohSuper Rod · version details vary

Celestic Town

Diamond max 15%
Super Rod · Lv. 40–55 · 15%
Pearl max 15%
Super Rod · Lv. 40–55 · 15%
Eterna City · SinnohSuper Rod · version details vary

Eterna City

Diamond max 45%
Super Rod · Lv. 20–50 · 4%Super Rod · Lv. 20–50 · 1%Super Rod · Lv. 30–40 · 40%
Pearl max 45%
Super Rod · Lv. 20–50 · 4%Super Rod · Lv. 20–50 · 1%Super Rod · Lv. 30–40 · 40%
Platinum max 45%
Super Rod · Lv. 30–40 · 40%Super Rod · Lv. 40–55 · 4%Super Rod · Lv. 40–55 · 1%
Great Marsh · SinnohSuper Rod · version details vary

Great Marsh Area 1

Diamond max 40%
Super Rod · Lv. 30–55 · 40%
Pearl max 40%
Super Rod · Lv. 30–55 · 40%
Platinum max 15%
Super Rod · Lv. 20–50 · 15%

Great Marsh Area 2

Diamond max 40%
Super Rod · Lv. 30–55 · 40%
Pearl max 40%
Super Rod · Lv. 30–55 · 40%
Platinum max 15%
Super Rod · Lv. 20–50 · 15%

Great Marsh Area 3

Diamond max 40%
Super Rod · Lv. 30–55 · 40%
Pearl max 40%
Super Rod · Lv. 30–55 · 40%
Platinum max 15%
Super Rod · Lv. 20–50 · 15%

Great Marsh Area 4

Diamond max 40%
Super Rod · Lv. 30–55 · 40%
Pearl max 40%
Super Rod · Lv. 30–55 · 40%
Platinum max 15%
Super Rod · Lv. 20–50 · 15%

Great Marsh Area 5

Platinum max 15%
Super Rod · Lv. 20–50 · 15%

Great Marsh Area 6

Diamond max 40%
Super Rod · Lv. 30–55 · 40%
Pearl max 40%
Super Rod · Lv. 30–55 · 40%
Platinum max 15%
Super Rod · Lv. 20–50 · 15%
Mt. Coronet · SinnohSuper Rod · version details vary

Mount Coronet (1F Road 207)

Diamond max 45%
Super Rod · Lv. 20–50 · 4%Super Rod · Lv. 20–50 · 1%Super Rod · Lv. 30–40 · 40%
Pearl max 45%
Super Rod · Lv. 20–50 · 4%Super Rod · Lv. 20–50 · 1%Super Rod · Lv. 30–40 · 40%
Platinum max 45%
Super Rod · Lv. 30–40 · 40%Super Rod · Lv. 40–55 · 4%Super Rod · Lv. 40–55 · 1%

Mount Coronet (4F)

Platinum max 15%
Super Rod · Lv. 20–50 · 15%

Mount Coronet (B1F)

Diamond max 45%
Super Rod · Lv. 20–50 · 4%Super Rod · Lv. 20–50 · 1%Super Rod · Lv. 30–40 · 40%
Pearl max 45%
Super Rod · Lv. 20–50 · 4%Super Rod · Lv. 20–50 · 1%Super Rod · Lv. 30–40 · 40%
Platinum max 45%
Super Rod · Lv. 30–40 · 40%Super Rod · Lv. 40–55 · 4%Super Rod · Lv. 40–55 · 1%
Oreburgh Gate · SinnohSuper Rod · version details vary

Oreburgh Gate (B1F)

Diamond max 45%
Super Rod · Lv. 20–50 · 4%Super Rod · Lv. 20–50 · 1%Super Rod · Lv. 30–40 · 40%
Pearl max 45%
Super Rod · Lv. 20–50 · 4%Super Rod · Lv. 20–50 · 1%Super Rod · Lv. 30–40 · 40%
Platinum max 45%
Super Rod · Lv. 30–40 · 40%Super Rod · Lv. 40–55 · 4%Super Rod · Lv. 40–55 · 1%
Ravaged Path · SinnohSuper Rod · version details vary

Ravaged Path

Diamond max 45%
Super Rod · Lv. 20–50 · 4%Super Rod · Lv. 20–50 · 1%Super Rod · Lv. 30–40 · 40%
Pearl max 45%
Super Rod · Lv. 20–50 · 4%Super Rod · Lv. 20–50 · 1%Super Rod · Lv. 30–40 · 40%
Platinum max 45%
Super Rod · Lv. 30–40 · 40%Super Rod · Lv. 40–55 · 4%Super Rod · Lv. 40–55 · 1%
Route 205 · SinnohSuper Rod · version details vary

Road 205 (east, towards Eterna City)

Diamond max 45%
Super Rod · Lv. 20–50 · 4%Super Rod · Lv. 20–50 · 1%Super Rod · Lv. 30–40 · 40%
Pearl max 45%
Super Rod · Lv. 20–50 · 4%Super Rod · Lv. 20–50 · 1%Super Rod · Lv. 30–40 · 40%
Platinum max 45%
Super Rod · Lv. 30–40 · 40%Super Rod · Lv. 40–55 · 4%Super Rod · Lv. 40–55 · 1%
Route 208 · SinnohSuper Rod · version details vary

Road 208

Diamond max 45%
Super Rod · Lv. 20–50 · 4%Super Rod · Lv. 20–50 · 1%Super Rod · Lv. 30–40 · 40%
Pearl max 45%
Super Rod · Lv. 20–50 · 4%Super Rod · Lv. 20–50 · 1%Super Rod · Lv. 30–40 · 40%
Route 210 · SinnohSuper Rod, Good Rod · version details vary

Road 210 (west, towards Celestic Town)

Diamond max 45%
Super Rod · Lv. 20–50 · 4%Super Rod · Lv. 20–50 · 1%Super Rod · Lv. 30–40 · 40%
Pearl max 45%
Super Rod · Lv. 20–50 · 4%Super Rod · Lv. 20–50 · 1%Super Rod · Lv. 30–40 · 40%
Platinum max 50%
Good Rod · Lv. 25–35 · 4%Good Rod · Lv. 25–35 · 1%Super Rod · Lv. 30–40 · 40%Super Rod · Lv. 40–55 · 4%Super Rod · Lv. 40–55 · 1%
Route 212 · SinnohSuper Rod · version details vary

Road 212 (east, towards Pastoria City)

Diamond max 45%
Super Rod · Lv. 20–50 · 4%Super Rod · Lv. 20–50 · 1%Super Rod · Lv. 30–40 · 40%
Pearl max 45%
Super Rod · Lv. 20–50 · 4%Super Rod · Lv. 20–50 · 1%Super Rod · Lv. 30–40 · 40%
Route 225 · SinnohSuper Rod · version details vary

Road 225

Platinum max 45%
Super Rod · Lv. 30–40 · 40%Super Rod · Lv. 40–55 · 4%Super Rod · Lv. 40–55 · 1%
Route 227 · SinnohSuper Rod · version details vary

Road 227

Diamond max 45%
Super Rod · Lv. 20–50 · 4%Super Rod · Lv. 20–50 · 1%Super Rod · Lv. 30–40 · 40%
Pearl max 45%
Super Rod · Lv. 20–50 · 4%Super Rod · Lv. 20–50 · 1%Super Rod · Lv. 30–40 · 40%
Platinum max 45%
Super Rod · Lv. 30–40 · 40%Super Rod · Lv. 40–55 · 4%Super Rod · Lv. 40–55 · 1%
Route 228 · SinnohSuper Rod, Good Rod · version details vary

Road 228

Diamond max 45%
Super Rod · Lv. 20–50 · 4%Super Rod · Lv. 20–50 · 1%Super Rod · Lv. 30–40 · 40%
Pearl max 45%
Super Rod · Lv. 20–50 · 4%Super Rod · Lv. 20–50 · 1%Super Rod · Lv. 30–40 · 40%
Platinum max 50%
Good Rod · Lv. 25–35 · 4%Good Rod · Lv. 25–35 · 1%Super Rod · Lv. 30–40 · 40%Super Rod · Lv. 40–55 · 4%Super Rod · Lv. 40–55 · 1%
Icirrus City · UnovaSuper Rod Spots · version details vary

Icirrus City

Black max 20%
Super Rod Spots · Lv. 35–70 · 15%Super Rod Spots · Lv. 45–70 · 4%Super Rod Spots · Lv. 45–70 · 1%
Black 2 max 80%
Super Rod Spots · Lv. 50–60 · 15% · Season WinterSuper Rod Spots · Lv. 50–60 · 4% · Season WinterSuper Rod Spots · Lv. 50–60 · 1% · Season WinterSuper Rod Spots · Lv. 60 · 15% · Season AutumnSuper Rod Spots · Lv. 60 · 15% · Season SpringSuper Rod Spots · Lv. 60 · 15% · Season SummerSuper Rod Spots · Lv. 60 · 4% · Season AutumnSuper Rod Spots · Lv. 60 · 4% · Season SpringSuper Rod Spots · Lv. 60 · 4% · Season SummerSuper Rod Spots · Lv. 60 · 1% · Season AutumnSuper Rod Spots · Lv. 60 · 1% · Season SpringSuper Rod Spots · Lv. 60 · 1% · Season Summer
White max 20%
Super Rod Spots · Lv. 35–70 · 15%Super Rod Spots · Lv. 45–70 · 4%Super Rod Spots · Lv. 45–70 · 1%
White 2 max 80%
Super Rod Spots · Lv. 50–60 · 15% · Season WinterSuper Rod Spots · Lv. 50–60 · 4% · Season WinterSuper Rod Spots · Lv. 50–60 · 1% · Season WinterSuper Rod Spots · Lv. 60 · 15% · Season AutumnSuper Rod Spots · Lv. 60 · 15% · Season SpringSuper Rod Spots · Lv. 60 · 15% · Season SummerSuper Rod Spots · Lv. 60 · 4% · Season AutumnSuper Rod Spots · Lv. 60 · 4% · Season SpringSuper Rod Spots · Lv. 60 · 4% · Season SummerSuper Rod Spots · Lv. 60 · 1% · Season AutumnSuper Rod Spots · Lv. 60 · 1% · Season SpringSuper Rod Spots · Lv. 60 · 1% · Season Summer
Moor of Icirrus · UnovaSuper Rod Spots · version details vary

Moor of Icirrus

Black max 20%
Super Rod Spots · Lv. 35–70 · 15%Super Rod Spots · Lv. 45–70 · 4%Super Rod Spots · Lv. 45–70 · 1%
Black 2 max 80%
Super Rod Spots · Lv. 50–60 · 15% · Season WinterSuper Rod Spots · Lv. 50–60 · 4% · Season WinterSuper Rod Spots · Lv. 50–60 · 1% · Season WinterSuper Rod Spots · Lv. 60 · 15% · Season AutumnSuper Rod Spots · Lv. 60 · 15% · Season SpringSuper Rod Spots · Lv. 60 · 15% · Season SummerSuper Rod Spots · Lv. 60 · 4% · Season AutumnSuper Rod Spots · Lv. 60 · 4% · Season SpringSuper Rod Spots · Lv. 60 · 4% · Season SummerSuper Rod Spots · Lv. 60 · 1% · Season AutumnSuper Rod Spots · Lv. 60 · 1% · Season SpringSuper Rod Spots · Lv. 60 · 1% · Season Summer
White max 20%
Super Rod Spots · Lv. 35–70 · 15%Super Rod Spots · Lv. 45–70 · 4%Super Rod Spots · Lv. 45–70 · 1%
White 2 max 80%
Super Rod Spots · Lv. 50–60 · 15% · Season WinterSuper Rod Spots · Lv. 50–60 · 4% · Season WinterSuper Rod Spots · Lv. 50–60 · 1% · Season WinterSuper Rod Spots · Lv. 60 · 15% · Season AutumnSuper Rod Spots · Lv. 60 · 15% · Season SpringSuper Rod Spots · Lv. 60 · 15% · Season SummerSuper Rod Spots · Lv. 60 · 4% · Season AutumnSuper Rod Spots · Lv. 60 · 4% · Season SpringSuper Rod Spots · Lv. 60 · 4% · Season SummerSuper Rod Spots · Lv. 60 · 1% · Season AutumnSuper Rod Spots · Lv. 60 · 1% · Season SpringSuper Rod Spots · Lv. 60 · 1% · Season Summer
Route 8 · UnovaSuper Rod Spots · version details vary

Road 8

Black max 20%
Super Rod Spots · Lv. 35–70 · 15%Super Rod Spots · Lv. 45–70 · 4%Super Rod Spots · Lv. 45–70 · 1%
Black 2 max 80%
Super Rod Spots · Lv. 50–60 · 15% · Season AutumnSuper Rod Spots · Lv. 50–60 · 15% · Season SummerSuper Rod Spots · Lv. 50–60 · 15% · Season WinterSuper Rod Spots · Lv. 50–60 · 4% · Season AutumnSuper Rod Spots · Lv. 50–60 · 4% · Season SummerSuper Rod Spots · Lv. 50–60 · 4% · Season WinterSuper Rod Spots · Lv. 50–60 · 1% · Season AutumnSuper Rod Spots · Lv. 50–60 · 1% · Season SummerSuper Rod Spots · Lv. 50–60 · 1% · Season WinterSuper Rod Spots · Lv. 60 · 15% · Season SpringSuper Rod Spots · Lv. 60 · 4% · Season SpringSuper Rod Spots · Lv. 60 · 1% · Season Spring
White max 20%
Super Rod Spots · Lv. 35–70 · 15%Super Rod Spots · Lv. 45–70 · 4%Super Rod Spots · Lv. 45–70 · 1%
White 2 max 80%
Super Rod Spots · Lv. 50–60 · 15% · Season AutumnSuper Rod Spots · Lv. 50–60 · 15% · Season SummerSuper Rod Spots · Lv. 50–60 · 15% · Season WinterSuper Rod Spots · Lv. 50–60 · 4% · Season AutumnSuper Rod Spots · Lv. 50–60 · 4% · Season SummerSuper Rod Spots · Lv. 50–60 · 4% · Season WinterSuper Rod Spots · Lv. 50–60 · 1% · Season AutumnSuper Rod Spots · Lv. 50–60 · 1% · Season SummerSuper Rod Spots · Lv. 50–60 · 1% · Season WinterSuper Rod Spots · Lv. 60 · 15% · Season SpringSuper Rod Spots · Lv. 60 · 4% · Season SpringSuper Rod Spots · Lv. 60 · 1% · Season Spring

Additional Images

PokeAPI sprites

Open this section to load extra PokeAPI sprite images.

Whiscash Biology and Behavior

Whiscash is a territorial swamp and pond predator that spends much of its time resting in a nest on the muddy bottom and waiting silently for prey to approach. Its eyesight is poor, so the long whiskers detect vibrations in the surrounding water and guide its attacks instead. When threatened or angered, Whiscash can slam its tail into the swamp bed hard enough to create earthquakes whose effects extend for more than three miles, and violent individuals may use those tremors to drive intruders away from their territory. Remarkably, it can also sense natural earthquakes before they occur, which has helped create confusion between quakes predicted by Whiscash and quakes supposedly caused by the Pokemon itself. Whiscash is extremely gluttonous and will swallow almost anything living that it can catch, sometimes whole, while also consuming large quantities of mud.

Whiscash Biological Data

National Pokédex
#340
Species
Whiskers Pokémon
Height
2' 11" (0.9 m)
Weight
52.0 lbs (23.6 kg)
Habitat
Waters Edge
Color
Blue
Body Style
Fish
Gender
50% female / 50% male

Misc

Catch Rate: 75

Base Experience: 164 Exp

Hatch Counter: 20

Whiscash Size Comparison: BETA

Whiscash is listed at 2' 11" (0.9 m); this chart uses a pose-adjusted visual scale.
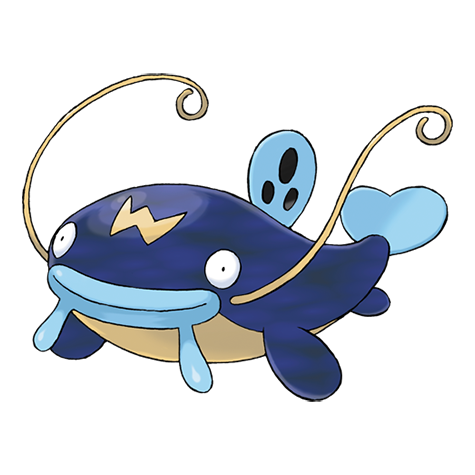
7 ft6 ft5 ft4 ft3 ft2 ft1 ft0 ft
whiscash
Professor Oak
How is visual size determined?

Pokédex height is treated as the official listed measurement, but the chart uses pose-aware visual scaling so each sprite looks reasonable in a direct comparison.

For long or coiled Pokémon, the listed height may represent total body length rather than upright height. For Pokémon with floppy ears, leaves, feathers, antennae, wings, or other flexible features, the chart usually measures to the top of the solid, substantial part of the head or body instead of the tallest decorative feature.

The goal is not to replace the official height, but to make the artwork compare naturally at the size it appears to occupy.

Whiscash currently uses a pose-adjusted visual scale.